Quantcast
Channel: The 3 Foragers: Foraging for Wild, Natural, Organic Food
Viewing all 174 articles
Browse latest View live

Foraging and Wild Mushroom Hunting 2014

0
0


A new camping season with friends has started, beginning with our first outing of the year, this past Mother's Day weekend. Sure, I didn't get flowers and breakfast in bed, but I did eat morels around the campfire and woke up to birdsong in the woods. Dinners were fantastic again, with communal cooking for the meals, our cooperation made mealtime easy and abundant. We had vegetarian chili, venison stew, beans and rice, fried dryad's saddle, and fresh bread for dinners. Potato pancakes, ramps and wild rice hash, and toad-in-the hole, plus bacon and toast filled our tummies in the mornings. We fished for a couple small brook trout, and gathered fresh ramps greens in the woods.


While our actual hunt only yielded 11 morels, 6 Morchella americana and 5 Morchella punctipes, we did find a good amount of tender Dryad's saddle (Polyporus squamosus) to slowly cook until browned and crispy. The season is late and chilly where we were camping, even the ferns were not yet unfurled and many trees were still leafless. Even with a thunderstorm and some night time rain, plus a flood in the screen house that needed to be drained, we still had a great time and look forward to the 2014 camping season with our fellow mushroom hunters and foragers.

Potato pancakes for breakfast


Morels Recipe - Morels and Ramps Biscuits

0
0

Living in Connecticut, we generally don't find too many morels. The soil is not right, the trees are not right, and historically, there just are not that many here. Last year it took six adults a few hours to find 27, this year those same six adults found only 12. On our forays with Connecticut Valley Mycological Society, most of the hunters return to the display table with a few specimens, rarely a dozen, and often the only morels in attendance were found off-site a few days before the foray, and brought out for observation and bragging rights. Last week I came home from work one afternoon to find Robert grinning like a fool, and he asked me to guess how many morels he found. Five? Ten? Nope, he found one hundred and forty nine. 149. He was out picking feral asparagus in one of the few patches we frequent in the spring, and realized he was surrounded by beautiful Morchella americana, the blonde morels. Since we had never had so many to deal with before, we wondered how to cook them up or preserve the precious harvest. Most were dried, some were added to scrambled eggs, some went into an asparagus and cream sauce, and the ugliest ones were chopped up and made into biscuits with ramps leaves (Allium tricoccum).

Morel and Ramps Biscuits                 makes 1 dozen

2 Tbsp butter
5 oz. chopped morels (by weight)
2 1/2 c. flour
1 Tbsp baking powder
1/2 tsp baking soda
1/2 tsp salt
4 Tbsp cold butter
3 Tbsp chopped ramps leaves and stems
1 c. buttermilk

1. Over medium heat, slowly sautee the chopped morels with 2 Tbsp of the butter for 10 minutes, until the morels are browned. Chill the butter/morel mix in the refrigerator until cold and re-solidified. 
2. Heat the oven to 425° F.
3. In a large bowl, mix the flour, baking powder, baking soda, salt, and chopped ramps together. Slice the 4 Tbsp of cold butter thinly and add it to the flour, and crumble in the cold butter/morel blend. Mix it all gently, making sure there are still pea-sized bits of butter in the mix.
4. Pour in the buttermilk and gently mix together, just until it forms a crumbly ball.
5. On a generously floured surface, dump out the dough and press into a ball. To get lots of flaky layers, roll it into a rectangle, then fold it into thirds like a business letter, pressing it together. Make a quarter turn, and roll it back out into another rectangle. Fold it again into thirds like a letter, and roll it into a rectangle about 6" x 8". Using a knife or biscuit cutters, cut out 12 biscuits and place on a parchment paper lined cookie sheet.
6. Bake at 425° F for 14-17 minutes, until lightly browned on top. Serve warm, preferably with gravy.


Spruce Tips

0
0

It's already June, but it still seems a bit cool this year in southeastern Connecticut. Most plants are a bit behind schedule, extending foraging possibilities for spring plants. One item we have always nibbled but have yet to experiment with has been the new, fresh growth of spruce trees, Picea sp. Spruce trees are your basic Christmas tree, and we mostly have red spruce growing in the wild, along with lots of ornamental blue spruce and Norway spruce having escaped cultivation. By this time of the year, the new growth has usually gotten too large and toughed up for nibbling, but we are still finding tips in some areas. The flavor is slightly resinous and piney, citrus-y, and rather refreshing. Gillian will often keep a few tips in her pocket to chew on while we hike. Maybe next season we'll get a chance to do some of our own experimenting with this spring edible, but for now I can just share some recipes on the internet.

Punk Domestics is a greats site I contribute to, it collects recipes and methods for all kinds of preserving, pickling, charcuterie, recipes, and some foraging. I usually head over there to find tested, quality recipes made by experienced cooks with lots of love.

Spruce Tips Recipes


Burdock Recipe - Burdock Root Pickles

0
0

Burdock is a biennial plant, and knowing which year plant is in is necessary before you attempt to dig and harvest the roots.  From the second year's growth, we gather the flower stalk, which is delicious peeled and boiled, tasting like artichokes. By mid-June, you can tell how old your burdock plant is, because that is when the flower stalk will bolt up from the center of the basal rosette. We dig the roots from the first year's plant, since they are less woody and stringy. The roots can be dug in spring, summer, or fall, but you'll get the biggest roots in the fall. Digging in sandy or rocky soil is easier, as is digging after it rains, because burdock roots are long and tough. Often you'll only get part of the root broken off, and that's fine to use for cooking or pickling. We have 2 burdocks in our area, great burdock (Articum lappa) and common burdock (Articum minus), both with edible roots. The Japanese consider burdock root a useful vegetable, and call it gobo. Here's a pickle recipe to make if you ever come across a big patch that was exceptionally easy to harvest, they're tart and make a nice addition to any pickle tray.


Burdock Root Pickles                 makes 1 quart jar

about 2 pounds burdock root, enough to fill a quart canning jar
1/2 c. soy sauce
1/4 c. water
3/4 c. rice wine vinegar
6 Tbsp apple cider vinegar
1 Tbsp diced garlic
1 Tbsp diced ginger

1. Peel the burdock root and cut it into uniform sticks. Boil the sticks in salted water for 5 minutes, until tender. Drain the sticks, then pack them tightly in a sanitized quart canning jar.
2. In another pot, add the soy sauce, water, rice wine vinegar, apple cider vinegar, garlic and ginger. Bring the brine up to a boil for 2 minutes.
3. Pour the brine over the burdock sticks, and let it sit for 10 minutes. Add more brine if needed to cover the burdock. At this point, you can keep the pickles in the fridge and eat them in about 3 weeks. If you want to make them shelf stable, cap the jar with a canning lid and boil the jar for 20 minutes to seal. The pickles taste best after resting for at least 2 weeks, and will keep in the fridge once opened.

Second year growth with flower stalk


Wintergreen Recipe- Wintergreen Meringues

0
0


Wintergreen (Gaultheria procumbens) is a lovely little perennial, ground hugging plant in our area. The leaves are leathery, but can be chewed while hiking for a refreshing wintergreen flavor. The red berries, also tasting of wintergreen, are abundant in the fall, and can over-winter into spring for gathering. We had a wild foods potluck to attend in June, so we went out to find some of last fall's berries, still clinging to the low foliage. I chopped them finely in the food processor. The berries are not juicy, they are rather dry inside with many seeds, which is why they can last under snowfall all winter. Once chopped, they made a paste, which I folded into the meringue recipe before piping into rosettes and baking. Quite popular at the potluck, I also had a hard time keeping Gillian's little fingers out of the cookie basket before they were served. There should not be too much color or browning on the meringues, if there is you need a lower oven temperature. Try not to bake these on a humid or rainy day, or they will just stay sticky and not really dry out. If you can't find berries right now, wait until late autumn to seek out wintergreen berries in abundance, most often under white pines.

Wintergreen Meringues                   makes about 48

1 c. wintergreen berries
4 egg whites, room temperature
1/2 tsp cream of tartar
1 c. sugar

1. In a food processor, chop the wintergreen berries into a coarse paste, scraping down the sides of the processor bowl. You will end up with about 4 Tbsp of a dry paste.
2. Preheat the oven to 250° F.
3. In a mixer bowl, whip the egg whites until foamy. Add the cream of tartar, then continue to whip to soft peaks.
4. Slowly add the sugar, and mix the egg whites until they form stiff peaks. With a whisk, mix in the wintergreen berry puree by hand, trying not to deflate the whipped egg whites.
5. Using a large star tip, pipe out the meringue into rosettes, leaving about 1/2" between each meringue. Bake for 3 hours until dry and crisp. Store in an airtight container.


Connecticut Boletes

0
0


July 2014, all found in one park in one hour
July and August are prime season for finding Boletes in our area of New England. CVMS holds a well attended educational day at the end of August in a local park, and the stars of the show are usually the collections of Boletes. Robert had chosen to study them, and works to identify finds using visual observations, smell, chemical tests, and his books. His favorite way to get to know the large amount of Bolete species in our area includes photographing them.

July is under way, so he'll be out in the field (and forest), looking for the edible, and inedible, beautiful, and sometimes confusing Boletes for the next two months. Wish him luck!

Xanthoconium affine

 
Likely an Strobilomyces that has been attacked by a Hypomyces


This is Not a Chicken Mushroom

0
0

This IS a chicken
One of our favorite wild mushrooms to hunt and eat is the Chicken Mushroom (if yellow pored, Laetiporus sulphureus, if white pored, Laetiporus cincinnatus). When harvested at the right stage of maturity, it has excellent texture and flavor, very similar to actual chicken. For a family of 2/3 vegetarians, like we are, it makes an awesome meat-replacer in many recipes like pot pies, tacos, in garlic sauce, and skewered. We actively search it out staring in the spring, all the way through the summer and into the autumn.

The yellow pored variety (Laetiporus sulphureus) causes brown heart rot in standing or fallen  hardwoods, so it often grows above ground or along a fallen log. Its wild yellow and orange colors are easy to spot at a distance, and the fruiting is often enormous, giving us enough for dinner for a few nights, some extra to freeze, and sometimes enough to make sausages with. They are real show-stealers at public events, when we talk about how delicious and versatile they are as food.

Gillian holding a white chicken, Laetiporus cincinnatus, this IS a chicken

The white pored variety (Laetiporus cincinnatus) causesbutt or root rot of hardwoods, often oaks, so is found at the base of the tree. or not far from the tree growing from the underground roots. White chickens are seemingly more tender than the yellow ones, but we don't seem to encounter them as often. Many people claim they taste better than the yellow pored chickens, but we are equally happy to find either.

Personally it drives me a little batty when I hear people refer to them as chicken "of the woods". We already have Hen of the Woods (AKA maitake or Grifola frondosa),  and not everything we find in the wild is referred to as "of the woods". I don't hunt "chanterelles of the woods" or "porcini of the woods". Some people on Facebook groups are proposing we call the white chicken "Crab of the Woods" to differentiate it from the yellow pored variety, and I will not do it. Just because I do find it in the woods, it is not of the woods, and I have run into people at public events who have a misconception that anything titled "of the woods" means it is a choice edible.

NOT A CHICKEN, Black Staining Polypore, Meripilus sumstenei

Which brings us to the topic of this whole post, the black staining polypore, which some want to refer to as "Rooster of the Woods". Its correct name is Meripilus sumstenei and it closely resembles the European Meripilus giganteus; some older guidebooks use the European name mistakenly. Like its more-correct common name (which are just terrible to use due to regional misunderstandings and not official or scientific at all, but good when speaking to the public who can't handle the binomials) describes, it often stains black with handling and has many pores (polypore) on the undersides of the  fronds. Older specimens won't blacken as much or as quickly as younger, fresher ones. They grow as overlapping fronds coming from wood, sometimes from buried roots that are not immediately visible. They can be very pretty to see, and are often surprisingly bug-free.

NOT A CHICKEN, A big Meripilus sumstenei

Are they edible? Technically, yes. You will want to try it if you have a really young one, although it will blacken to an unappetizing degree while cooking. One mushroom club member has recommended grinding it and using it in a mushroom loaf application. I say I'll wait until I find something better. As it ages, it gets really fibrous and stringy and I can only imagine it will taste like eating a piece of shredded fabric. Their size also makes you want to eat it, because it would potentially feed a family for weeks!

Still NOT A CHICKEN, a baby Meripilus sumstenei looking deceptively orange

Gillian and a Berkeleys

At this time of year, mid-summer, we start seeing them proliferate. Hiking through the woods in search of choice edibles, we catch sight of the behemoths from the corners of our eyes and initially gasp with delight, for their overall shape resembles a chicken or maitake, but then logic takes over when we realize the color is wrong for a chicken and the season is too early for a maitake. You might even think you found a Berkeleys polypore (Bondarzewia berkleyi), which is another marginal edible, but the Berkeleys doesn't stain and is much less fibrous. Facebook mushroom ID pages are littered with posts asking if these are "Chicken of the Woods" and filled with people desperate to eat them. Even the identification tables at CVMS forays are heavy with the weight of black stainers found on site and brought from afar from our newest members who think they found chickens. Sorry to disappoint, but it's just another Meripilus. But never give up, because the odds are in your favor that by putting in all those miles and hours scouring the woods will eventually yield to you a real chicken, not the lesser pretenders.

Black Fungi of Summer

0
0

Black trumpets (Craterellus cornucopiodes), also known as the trompette de la morte, the trumpet of death. They are actually quite delicious.

There are so many colors of summer for which we forage; deep green leaves, blueberries, red wineberries, orange daylily flowers, light green milkweed pods, yellow dandelions. Hunting for fungi, we see red and green Russulas, bright yellow Hygrocybe, purple Clavaria zollengeri, and plenty of little brown mushrooms. It's the absence of color that is often the most striking, the black hole on the forest floor, that stops us in our tracks. While not all  are edible, they are certainly beautiful.

Inocybe taquamenonensis, they love a wet area with moss and skunk cabbage nearby
Bulgaria inquinans, black and squishy

Resupinatus applicatus, these are only 3-8 mm wide

Inonotus obliquus, chaga, the tinder fungi

Strobilimyces bolete, Old Man of the Woods
Geoglossum species, Ascomycota, black earth tongues


Tylopilus alboater, the black velvet bolete, a dense and delicious bolete that is often blissfully bug-free

Another gorgeous black trumpet


Edible Milky Mushrooms In Connecticut

0
0
The foray table, loaded with mushrooms for the ID session

Weekly forays with Connecticut Valley Mycological Society have us out in many locations throughout the state of Connecticut looking for fungi. We particularly like the edibles (of course!), but most of the mushrooms that come back to the identification table are not edible, some will make you sick, and a few can kill you, and those are definitely the ones you want to learn and avoid.

Lactarius volemus, close and creamy-white gills, mildly fishy smell, large volume of white milk

Lactarius hygrophoroides, wider
spaced gills and white milk
Initially, the weirder mushrooms we would find are in the genus Lactarius, and they can produce a milky latex-like substance when cut, scratched, or injured. Sometimes the milk is white, other times it is yellow, or can stain to red or blue. Kind of freaky, right? It turns out that some of those milky mushrooms are excellent edibles, and we collect them to take home. We collect three species for eating: Lactarius volemus, Lactarius hygrophoroides, and Lactarius corrugis. There are a few other edible Lactarius, but these three are species we can find in abundance in the summer in New England. When pan fried with a bit of oil or butter, they manage to retain a nice textural crunch. The L. volemus and L. corrugis have an unusual fishy odor when fresh, a key identifying characteristic, and some people think the odor carries over to the flavor; I find them to be an excellent edible, with an iron-y quality that doesn't have the fishy taste.

Gillian with an exceptionally nice specimen of Lactarius corrugis, showing its darker cap color

We love Connie!
Brined Lactarius and milkweed filling


Another benefit of being with CVMS is the collective knowledge of other
members when it comes to cooking, eating, or preserving the fungi. One club member, Connie, told Robert about salt-brining the Lactarius mushrooms for long term storage, a technique he now uses every year. We can sometimes find more than a dozen large, bug-free specimens on a foray day to bring home and begin the brining process. Robert begins by cleaning the Lactarius gently, then cutting them into quarters. He boils them about 10 minutes, lets them cool, then drains the cooking water. Sometimes we don't collect enough for a full jar, so he stores the cooked mushrooms in salted water in the fridge until we can collect enough for the brining process. Once we have enough, he layers them in a non-reactive glass jar, adding a few spices like garlic, peppercorns, or onions between layers, and salts each layer liberally before adding more cooked mushrooms. He allows the jar to sit a day or so, to see how much more liquid the mushrooms will exude under the salt, then adds enough clean water to cover the mushrooms entirely. They then can be stored in a cool place until we need them, and he has successfully stored them in this manner for about one year without mold forming. To use the preserved mushrooms, we remove them from the salt brine, rinse them, and soak them in fresh water overnight. They are then ready to be used in recipes, like Mushroom Paprikas, or I used them mixed with milkweed flower buds and ramps bulbs as a stuffing for steamed buns for a CVMS potluck picnic.

Lactarius corrugis, showing darker corrugated caps, darker tan-colored gills, and white milk

Becoming familiar with an edible mushroom that can produce a crazy and weird milk-like substance really opened our minds to the culinary possibilities of fungi in general. Previously, I was terrified of wild mushrooms, a real mycophobe, and it was my insistence that we learn mushrooms from people and not books that led us to CVMS and its wonderful members. I cannot stress enough how important it is to seek out and find wild food mentors to teach you the hands-on knowledge that can't be gained from a guide book, whether plants, fungi, or other foraging skills. While we are still not comfortable teaching in a commercial manner yet, we are always interested in learning and are willing and able to pay dues and for classes to further our education and experiences. Forage on!

Making Bayberry Candles

0
0


Last summer Gillian went off to Colonial Survivor summer Camp at the Connecticut River Museum and had a great time building stone walls, tending the chickens, erecting a post and beam structure, and dying textiles with plants they collected on site. One thing they did not try was making bayberry candles from real bayberries. Bayberry candles were made by the colonists because they were cleaner burning and better scented than the candles made from tallow, or animal fat. Colonist folklore states that if you light a new bayberry candle on Christmas Eve, you’ll have health, wealth and prosperity in the coming year. The adage reads: A bayberry candle burnt to the socket brings food to the larder and gold to the pocket.


In Connecticut, we have the northern bayberry, Myrica pensylvanica. It is not ideal for wax extraction, as it produces much less than the southern bayberry, but it's what I have to work with. The bushes are dioecious, meaning there needs to be male bushes to pollinate and set the fruit on the female bushes.They are a dense-branching deciduous shrub, native to North America where it is primarily found growing along the eastern coast (including seashore) from Newfoundland to North Carolina. We often find them used in landscaping applications in parking lots because they form attractive thickets and hedges. The blue-grey berries are clustered along the branches where the flowers were pollinated. We also gather the mildly fragrant leaves to press dry and use as a substitute to commercial bay leaves; we use more bayberry leaves in a recipe as their flavor is not as strong as commercial bay leaves.


On a recent trip over to Long Island, we were picking beach plums and I noticed the bayberries seemed especially abundant, and I gathered a gallon of them to take home. My hands were coated with their wax and fragrance for the rest of the day, as I just grabbed the clusters of berries and pulled them into a bucket.


It takes about 15 pounds of bayberries to render 1 pound of wax, so I knew I would not get too much wax from my one gallon. I shook the berries in a mesh sieve to get some of the smaller debris out, then placed them in a large pot with some water. I brought the pot up to a boil, and then simmered the berries for 15 minutes. The berries and most of the sticks and stems will sink, while the wax will float up to the surface of the water. I then ladled and strained the hot wax through an old jelly bag to remove more of the debris and dirt. I let the wax and some of the hot water cool in a plastic container, where the wax floated to the top and hardened. The wax block was easy to pop out and dry off, and there was about 1/3 cup of fragrant, green wax. Off to the craft store, where I purchased some votive molds, wicks, and unscented candle wax to mix with the bayberry wax. The bayberry wax is a bit weak and prone to discoloration and warping over time, so I chose to make  short votives and fortify the wax with plain wax. With my little bit of bayberry wax mixed with plain wax, I managed to pour three candles which we will burn on New Year's eve into New Years day for abundance and blessings, and for the memories of a summer day on Long Island gathering bayberries in the sun.

Public Event!

0
0
Sunday, October 5 | 3 - 5 PM | Sugar House
What are those weird things that pop up in the woods after the rain? Are you mystified by wild mushrooms? Curious? Scared? Or do they make you hungry?

Come to Flanders Nature Center in Woodbury, CT join a foraging family who hunt, photograph, identify, and love to eat the fungi in New England for a discussion and walk identifying mushrooms (appropriate for beginners). Dispel myths, learn how to safely identify mushrooms, and discuss mycophagy, the cooking and eating of wild mushrooms.

The 3 Foragers are a family from southeast Connecticut and members of Connecticut Valley Mycological Society, Connecticut-Westchester Mycological Association, and the North American Mycological Association, as well as avid wild food foragers.
Location: The Sugar House, located ¼ mile up Church Hill Road 

Pre-registration is required.

The Program fee is: $10 members and $15 non-members
or 
Please call (203) 263-3711 x 12


Flanders Nature Center & Land Trust | 5 Church Hill Road | Woodbury, CT 06798 | 203-263-3711

Chestnut Recipe-Chestnut Mousse

0
0

In our area of Connecticut we can find many Chinese chestnut (Castanea mollissima) trees on old farmsteads and in a few parks. They don't make good landscaping trees because of the spiny hulls that drop to the ground, and I have found sources of nuts by asking on Freecycle and offering to help clean up a person's yard in exchange for the nuts. The native North American chestnuts had been mostly wiped out by a fungal blight, although there are groups working to hybridize them and make them resistant to the blight. An estimated 3 billion chestnuts trees died from the blight introduced in the early 1900's. We find the Chinese chestnuts have good flavor, even better than the imported Italian chestnuts we can buy at the grocery store, but supposedly not as good as our native chestnuts.


This year was mostly a bust for most nuts, including black walnuts, white oak acorns, and hickory nuts, but we did mange to find a good amount of chestnuts to eat. Gillian likes them boiled and peeled, and we sometimes have a hard time getting her to stop eating them all before we can cook with them! I add them to rice pilaf and made a squash-chestnut soup with wild maitake mushrooms, but this dessert mousse is our favorite. Most of our boiled and peeled chestnuts are portioned out in the freezer, ready to thaw and make mousse later in the year.

Chestnut Mousse           makes about 12 1/2 cup servings

10 oz. peeled chestnuts
1 c. milk
3 Tbsp. spiced rum
1 whole egg
1 egg yolk
1/2 c. sugar
1/3 c. water
1 Tbsp. spiced rum
2/3 c. heavy cream

1. Place the chestnuts in a small saucepan with the milk and 3 Tbsp. spiced rum. Simmer for 20 minutes, until the chestnuts soften and the milk reduces. Puree the chestnuts and milk in a food processor until smooth, and cool. It will be quite thick.

2. In a mixer bowl, combine the whole egg and the egg yolk, whip on high until thick and frothy, about 6 minutes.

3. In another small saucepan, combine the sugar and water and bring up to a boil. Cook until it reaches 235 degrees, or soft ball stage. Pour the hot sugar into the egg and whip on high until cooled, about 8 minutes. It will be thick and light yellow.

4. Whip the heavy cream to stiff peaks.

5. In a large bowl, whisk the final 1 Tbsp. of spiced rum into the chestnut puree. Pour half of the egg/sugar mixture into the chestnut puree and whisk it together until smooth. Add the remaining egg/sugar mix and whisk until completely smooth. Gently fold in the whipped heavy cream, mixing until no white streaks remain. Pipe into serving glasses, or into a cake lined mold and chill. The mousse will thicken and become firm as it chills. Serve with cranberry sauce or shaved chocolate.

Chestnut trees in flower in spring


Final Frozen Forage of 2014

0
0
Gillian bundled up and foraging on December 31, 2014

I was chatting with a friend this morning and kind of whining about how cold it was outside (upper 20's) and how boring the winter is here in Connecticut. We won't have any fresh greens, fruit, or mushrooms for months I lamented. She was kind enough to point out there is no snow on the ground and we could still go outside for a short walk and maybe find some rosehips or other hearty wild foods. Great idea, thanks Stephanie.


We bundled up and put on multiple layers before heading out to the cranberry bog for a peek. It has only been cold for a few days, but the rain that fell last week in the field had frozen into sheets of ice, making it lots of fun to slip around. There are still plenty of cranberries (Vaccinium macrocarpon) left in the field, and we snacked on some while picking a small container of berries to bring home. Gillian had the most fun, finding the ice crystals that formed on the grasses stunning, and the air pockets under the ice cool to break open while popping frozen cranberries into her mouth. The cold mellowed out the tartness quite a bit, and they were softened by being frozen. Robert made a ginger-cranberry syrup with the soft berries, and I cooked the rest up into a traditional cranberry sauce to eat with pancakes for breakfast.


Moving on down the path through the surrounding bog, we marveled at the frozen pools of water and the sphagnum moss trapped under the ice in pristine condition. The sun was shining and reflecting off the sheets of ice, and it looked slightly unreal.


Further into the forest, we encountered plenty of pines and mixed spruce trees mixed in with oaks and birches. The needles of the white pine (Pinus strobus) can be made into a bracing, pine-scented tisane that contains vitamin C and tastes really good mixed with plenty of honey.

Wintergreen leaves and berry
 
 
Partridgeberries
Pine forests are preferred habitats for two more hearty plants to forage in winter, wintergreen (Gaultheria procumbens) and partridgeberries (Mitchella repens). Both of the evergreen plants had their edible berries present. While the partridgeberries growing from the non-edible, prostrate foliage are mostly tasteless, we picked a few to add color to a rice and grain salad for lunch. The leathery leaves and red, crowned berries of wintergreen both have the minty, wintergreen flavor, and we plucked some of both to make into a refreshing, warm tisane.

As for the fungi, we spotted the usual suspects on dead wood, crusts and polypore shelves. These mushroooms are just doing their job of breaking down the wood and decomposing the dead wood into sawdust and back into soil. Last week we came across some stunning blue turkey tails (Trametes versicolor) on another walk. Turkey tails come in many color combinations from oranges, browns, tans, greys, and sometimes subtle shades of blues. I was very surprised to find one poor, frozen, blackened-with-age gilled mushroom. I am not sure what it was, but it was my last fungi find for the year of 2014.


Yule Cake

0
0

Every year I make a yule log cake for family holiday gatherings, as one of the many belly-busting desserts. According to Wikipedia, from the Encyclopedia of English Folklore

"For as both December and January were called Guili or Yule, upon Account of the Sun's Returning, and the Increase of the Days; so, I am apt to believe, the Log has had the Name of the Yule-Log, from its being burnt as an Emblem of the returning Sun, and the Increase of its Light and Heat."

This year my family was scattered and we didn't have a large gathering, so I made the yule log cake to bring to a party given by friends, fellow mushroom enthusiasts, in honor of their new home.

The cake is a vanilla biscuit, filled with a passion fruit mouse, made from passion fruit juice we brough back last year from the Auntie Lilikoi factory on Kauai. The frosting is an Italian buttercream, and the cake is streaked with chocolate to resemble a white birch log, common here in Connecticut. The jumble of chunky chocolate is meant to resemble a medicinal chaga (Inonotus obliquus) that we gather to make decoctions. Maybe only a few poeple might get our obsession with mushrooms, but we are completely loving our fungal adventures!

Real chaga on silver birch

Plus I made a basket full of the traditional meringue mushrooms for snacking. Sweet!


Cattail Griddlecakes with Fresh Oyster Mushrooms for Breakfast

0
0


After watching a TED talk given by Sunny Savage, a wild food forager currently living in Hawaii on the island of Maui, we have been inspired to follow her mantra of "Eat a Wild Food Every Day". She advocates incorporating wild foods into your daily diet by just adding a little bit at a time to start, increasing the nutrition of any meal. We agree, and have been following this idea for years, adding nutrition, color, and interesting flavors to normal meals everyday. For us, it is second nature to reach into our stores of frozen, dehydrated, pickled, or jellied wild food stores to add something we foraged ourselves to a meal. Adding frozen wineberries to smoothies, cooking a soup with dried wild mushrooms, making pasta with dried and powdered nettles, or grinding garlic mustard seeds into spicy mustard is something we do nearly every day.


We were gifted a mushroom growing kit for Christmas, and promptly got it going, watching as the tiny oyster buttons grew larger the more we watered them, and finally harvesting the clump for breakfast this morning. 


The cattail griddle cakes were made with the male flowers of the cattail plant (Typha latifolia), gathered last spring before they produced their pollen. We go out in tall boots to snap the cattail flowers off the stalks, and bring them home to clean. The top portion of the flower is the male section, and can be easily pinched off the slim core into flaky bits that have a mild corn-like flavor. The  male flower parts freeze really well, portioned out into 1 cup containers, the perfect amount for a single recipe of griddlecakes. The lower, female section of the flower doesn't flake off like the male portion, but can still be steamed for a few minutes and chewed like corn on the cob, although you don't end up with a lot of actual material to chew. If left to mature, the male portion of the flower will produce the pollen that falls to the lower female portion of the flower, then the male flower falls apart and falls away, leaving the female portion to mature into the typical, brown cattail stalk that turns to fluff in the fall as the mature seeds are spread.We also gather the pollen from cattails later in the spring by snapping the pollen-filled male portions off into a bag, then shaking the bag vigorously. Then the pollen in sifted a few times to remove debris and small bugs, before being lightly dried and stored in the freezer to add to pancakes, biscuits, or smoothies.

Cattails
A little more mature, male part on the top


Wild Smoothies

0
0

One benefit of putting up the wild foods we harvest is that we are able to use many of the ingredients when they are out of season. Drying, freezing, and canning wild food provides us with a full pantry of berries, greens, and powders to use in everyday food preparation. We really do manage to eat wild food every day, even in the middle of winter with more than a foot of snow on the ground, like there is today! Gillian loves making smoothies for breakfast, and we finally saved up enough money to purchase a really good Vitamix blender, so she gets smoothie duty every morning, coming up with combinations using frozen berries, honey or agave syrup, bananas, and a splash of juice or almond milk since we don't drink much cow's milk. Robert tends to make more complex and adventurous smoothies, using dried powders and sometimes fresh greens and  a touch of cayenne.


Autumn olives are our favorite invasive berry to collect in great quantities. They freeze very well, make lovely jelly and fruit leathers, cook down into excellent sauces and ketchup, and are very nutritious: full of lycopene and vitamins A, C, and E. The seeds, which are soft and edible, contain omega-3 fatty acids. Personally, I spit the seeds out because I don't like seeds in my fruit, but Robert and Gillian chew them right up with the ripe berries. With the blender, Gillian adds the whole, frozen autumn olives with bananas and lets it blend well enough that I don't mind drinking the pulverized seeds within the smoothie. Autumn olive berries get much sweeter after freezing, but we still add a touch of honey or orange juice to the smoothie.


We collect pine pollen and cattail pollen in late spring, drying it and keeping it in jars in the freezer to add bright yellow nutrition to breads, pancakes, and smoothies all year long. For this smoothie, Robert used pine pollen collected along the shoreline of Rhode Island, uncooked oats, bananas, and almond milk with a spoonful of honey for sweetness. Pine pollen has all 8 essential amino acids, minerals and is a powerful antioxidant, as well as a natural source of steroidal-type substances like testosterone, DHEA, and androsterone. This smoothie was wonderfully thick from the oats and sweet from the fruit and honey, one of my favorites.


Chickweed is one wild green we can sometimes find late into the fall and even in the winter if there isn't too much snow on the ground. It prefers cooler weather, disappearing in the hot summer, and re-sprouting in the fall from the seeds that fell in the spring before it died back. The flavor of chickweed is very mild and bit like the silk of ears of corn. We add it to salads and smoothies, tossed into soups at the last minute of cooking, and use it on sandwiches like sprouts. Chickweed doesn't dry or freeze well, so sometimes we just get lucky when finding it on a mild winter day and use it fresh. It contains vitamin A, B, C and a bit of iron along with other minerals and silica. While the light green color of the smoothie turned Gillian off, Robert and I both enjoyed this last little blast of fresh, green goodness before the harshness of winter set in.


This wild blueberry and huckleberry smoothie probably had some bananas and cranberry juice added. We picked the wild blueberries and huckleberries from the same patch of poor, acidic soil last year, putting our newly purchased blueberry rake to the test. The forest has a mix of low-bush and high-bush blueberries and huckleberries all mixed together, so we just kept them blended and made a batch of jam and froze the rest of the berries. While both berries appear very similar, taste similar, have similar amounts of iron and antioxidants, and are equally edible, you can tell them apart by checking the seeds. Wild blueberries have many small seeds spread throughout the inside of the berry; huckleberries have a ring of 10 larger seeds (botanically nutlets) arranged in a ring inside the berry at its equator. The rich, purple color is a good indicator of anthocyanins, a powerful antioxidant. Wild blueberries and huckleberries also contain high amounts of fiber and maganese as well vitamin K and C. This smoothie was sweet and delicious, one Gillian's favorites, letting us know we need to pick more wild blueberries and hucklberries next year for the freezer!


Sharing, Teaching, and Tagging Along

0
0

We get asked very often by new foraging enthusiasts and beginners if we give classes or can let someone tag along with us while we are out foraging. We don't offer formal classes for money like many other foragers, or private lessons about foraging for a few reasons I would like to explain. 

Gillian eating wild carrots, NOT FOR BEGINNERS!
1. Liability. This is a big one for us, as we are not willing to be sued for someone's reckless behavior and bad identifications when they try foraging. Different people can have different reactions to any new foods, and we are not willing to take responsibility for this risk. Poor and hasty identifications by beginners who are very determined to eat wild foods terrify us. Liability waivers are essentially useless and offer no protection.


2. Local land use laws. In Connecticut specifically, there are statutes that do  not allow the removal of plants or natural materials from state land for any purpose, including pine cones for your kid's crafts! While we do not agree with this particular law, we cannot take people out into public lands to collect wild foods. We hike and forage on private property of friends and family in most cases, and do a bit of "roadside foraging" along lightly traveled dirt roads for berries or mushrooms.

We are also wary of sharing "our spots" with strangers. We would just hate to return to a ramps patch that has been pillaged for commercial sale, or trash strewn about in the woods left behind by someone with whom we shared some foraging fun and secrets.


3. Foraging is not a group activity. This does not apply to teaching, but to actual harvesting. If we are out forging with a few people who are just tagging along to learn and come across a beautiful maitake mushroom, how would we fairly share it? If we come across a small patch of 100 ramps with a group of 10 people, how could we possibly collect in a sustainable manner? Taking 10% or less of a wild food is how we collect for ourselves, so that patch would yield 1 single ramp per person to stay sustainable. Sustainability is not of an issue when it comes to collecting invasive species, which we strongly encourage. 


4. Our foraging time is our family time. Both my husband and I work, and our daughter is in elementary school all week. When we hit the woods, we are spending quality time together as well as searching for edibles. We meander on obvious paths and take many detours to indulge our daughter's interests in rocks and to build fairy houses, and Robert spends lots of time taking photographs from many angles of several specimens. We are enjoying our day and time together, and sometimes we do go out with friends, but even then it is still our leisure time.


We are willing to work through and with groups or nature centers that share our values on education and conservation, and look forward to signing up for more public opportunities for teaching. We have in the past worked with Flanders Nature Center to give a short program on mushroom hunting for beginners, which included a slide show and a short hike. We taught some members of the COMA mushroom group about basic foraging at their annual Fungus Fair event. Our other mushroom club, CVMS, has several public events each year where we display mushrooms collected by club members and we discuss their names and edibility, including the Denison Pequotsepos Nature Center. At the Coventry Regional Farmer's Market, we gave a short walk around the grounds during their Fungi and Forage weekend market, discussing many edibles like grapes, nettles, and hazelnuts at the edge of the market field. Much of our experience has come through taking paid classes and walks with educators in our area of New England, like Wildman Steve Brill, Russ Cohen, Gary Lincoff, and Blanche Derby. We are happy to recommend trustworthy foraging instructors that we have walked with, and direct interested individuals to their websites.


This blog, which has always been and will always be free to anyone to read is our main sharing tool right now. We take many, many photographs of plants and fungi to make sure they are clear, and spend hours researching plants to share information on their edibility. We spend even more hours writing, testing, and photographing recipes made with wild foods. We have purchased over 70 books on wild edible plants, field guides, mushroom identification guides, and forager's stories, filling a bookshelf with information at our fingertips. We will continue to purchase books, because we are always learning and I like to have multiple sources of information, as well as to support our fellow foragers.

In spring of 2016, we will have our own book published, focusing on the safest and tastiest wild edibles a beginner or family can start their foraging adventures with. We believe foraging is a fantastic family activity, even if it is for a few berries growing along the fence in the backyard or the weeds growing between your tomato pants in the garden. We also believe in sharing the knowledge of wild foods, and will continue to use this blog and the upcoming book, along with a few sponsored public events, rather than private tours, to share our experiences and adventures.

Beach Plum Recipe- Beach Plum and Hickory Nut Quickbread

0
0

Deep in the winter, when everything is under more than two feet of snow, we start getting bored with the short days, long nights, and lack of outdoor recreation. None of us are snow bunnies, and we already took our yearly vacation. Our meals made with preserved, dried, or frozen wild foods are the only thing that remind us of the bounty that awaits us next season. Looking into our freezer, we can find frozen greens like dandelion, garlic mustard, nettles, and ramps; berries like autumn olives, wineberries, cranberries, blueberries, and huckleberries; fruit like beach plums and feral pears; mushrooms like honeys, maitake, and sulfur shelf; and nuts like black walnuts and hickory nuts. We can still eat a wild food everyday when we dip into our assorted stores and pantry.


The annual Willimantic Food Co-op birthday party took place this past February 14th, and we contributed one of the 35 birthday cakes for their event, making a Beach Plum and Hickory Nut Coffee Ring, but had a bit of batter left over and made it into quick loaves for us to eat at home. I had some lightly stewed, unsweetened beach plums in the freezer, along with the hickory nuts. In the summer when we picked the cooler full of beach plums, after pitting them by hand, I made jelly from the majority of the fruit, and then took the rest of the fruit and cooked it for 5 minutes then placed it in containers to keep in the freezer. When I make this recipe, the thawed beach plums are juicy, so I
strain them to keep from adding too much liquid to the batter and use the leftover juice to make an electric pink/purple glaze by whisking in some powdered sugar, or you could use the leftover juice in some seltzer or over ice cream. This recipe could also be used to make muffins or a 12" bundt ring.

Beach Plum and Hickory Nut Quickbread     makes 2-8" x 4" loaves or 12 muffins

2 c. all purpose flour
1/2 c. sugar
1/2 tsp. salt
1 tsp. baking powder
1/2 tsp.  baking soda
1 c. buttermilk
2 large eggs
1/4 c. butter melted, or 1/4 c. oil
1 c. strained, stewed beach plums
1/2 c. chopped hickory nuts
powdered sugar

1. Preheat the oven to 400º F and grease 2 loaf pans or line muffin tins with papers.
2. Combine the flour, sugar, salt, baking powder, and baking soda in a large bowl.
3. Whisk together the buttermilk, eggs, and oil or melted butter in another bowl.
4. With a wooden spoon, mix the wet ingredients into the dry ingredients, mixing until just combined, some small lumps may remain. Gently mix in the drained beach plums and hickory nuts.
5. Divide the batter into the pans and bake at 400º F for 10 minutes, then reduce the heat to 350º F for 10-25 minutes, until the muffins or loaves are finished. Test by pressing the tops, they should spring back lightly. Cool and remove from pans.
6. Optional: Use the leftover juice from straining the beach plums and whisk it into powdered sugar to make a thin glaze to cover the tops of the loaves or muffins for added sweetness.

I know the bread looks a bit weird and blue/purple when sliced, it is a reaction from the super acidic plums and the alkaline baking soda!


Winter Tisane Party

0
0

No matter how we line them up, set them out, brew them up, winter is a great time for a tea party, or in this case a tisane party. Tisanes are herbal teas, an infusion or decoction of herbs, spices, or other plant material into a drink that usually does not contain caffeine. With the jars full of dried herbs and plants we have collected over the year, we managed a grand tisane tasting of ten brews, sweetened, unsweetened, and blended through a rainbow of colors and assortment of flavors. Can you take a guess at the the line up?


Tisanes

0
0

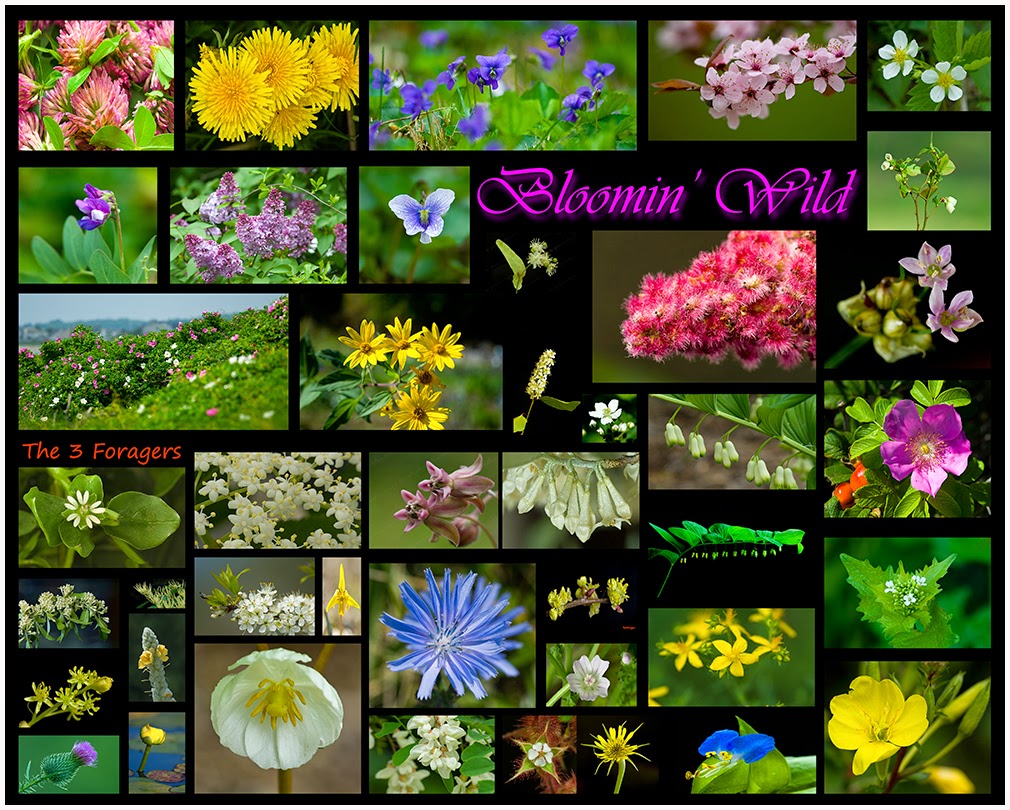
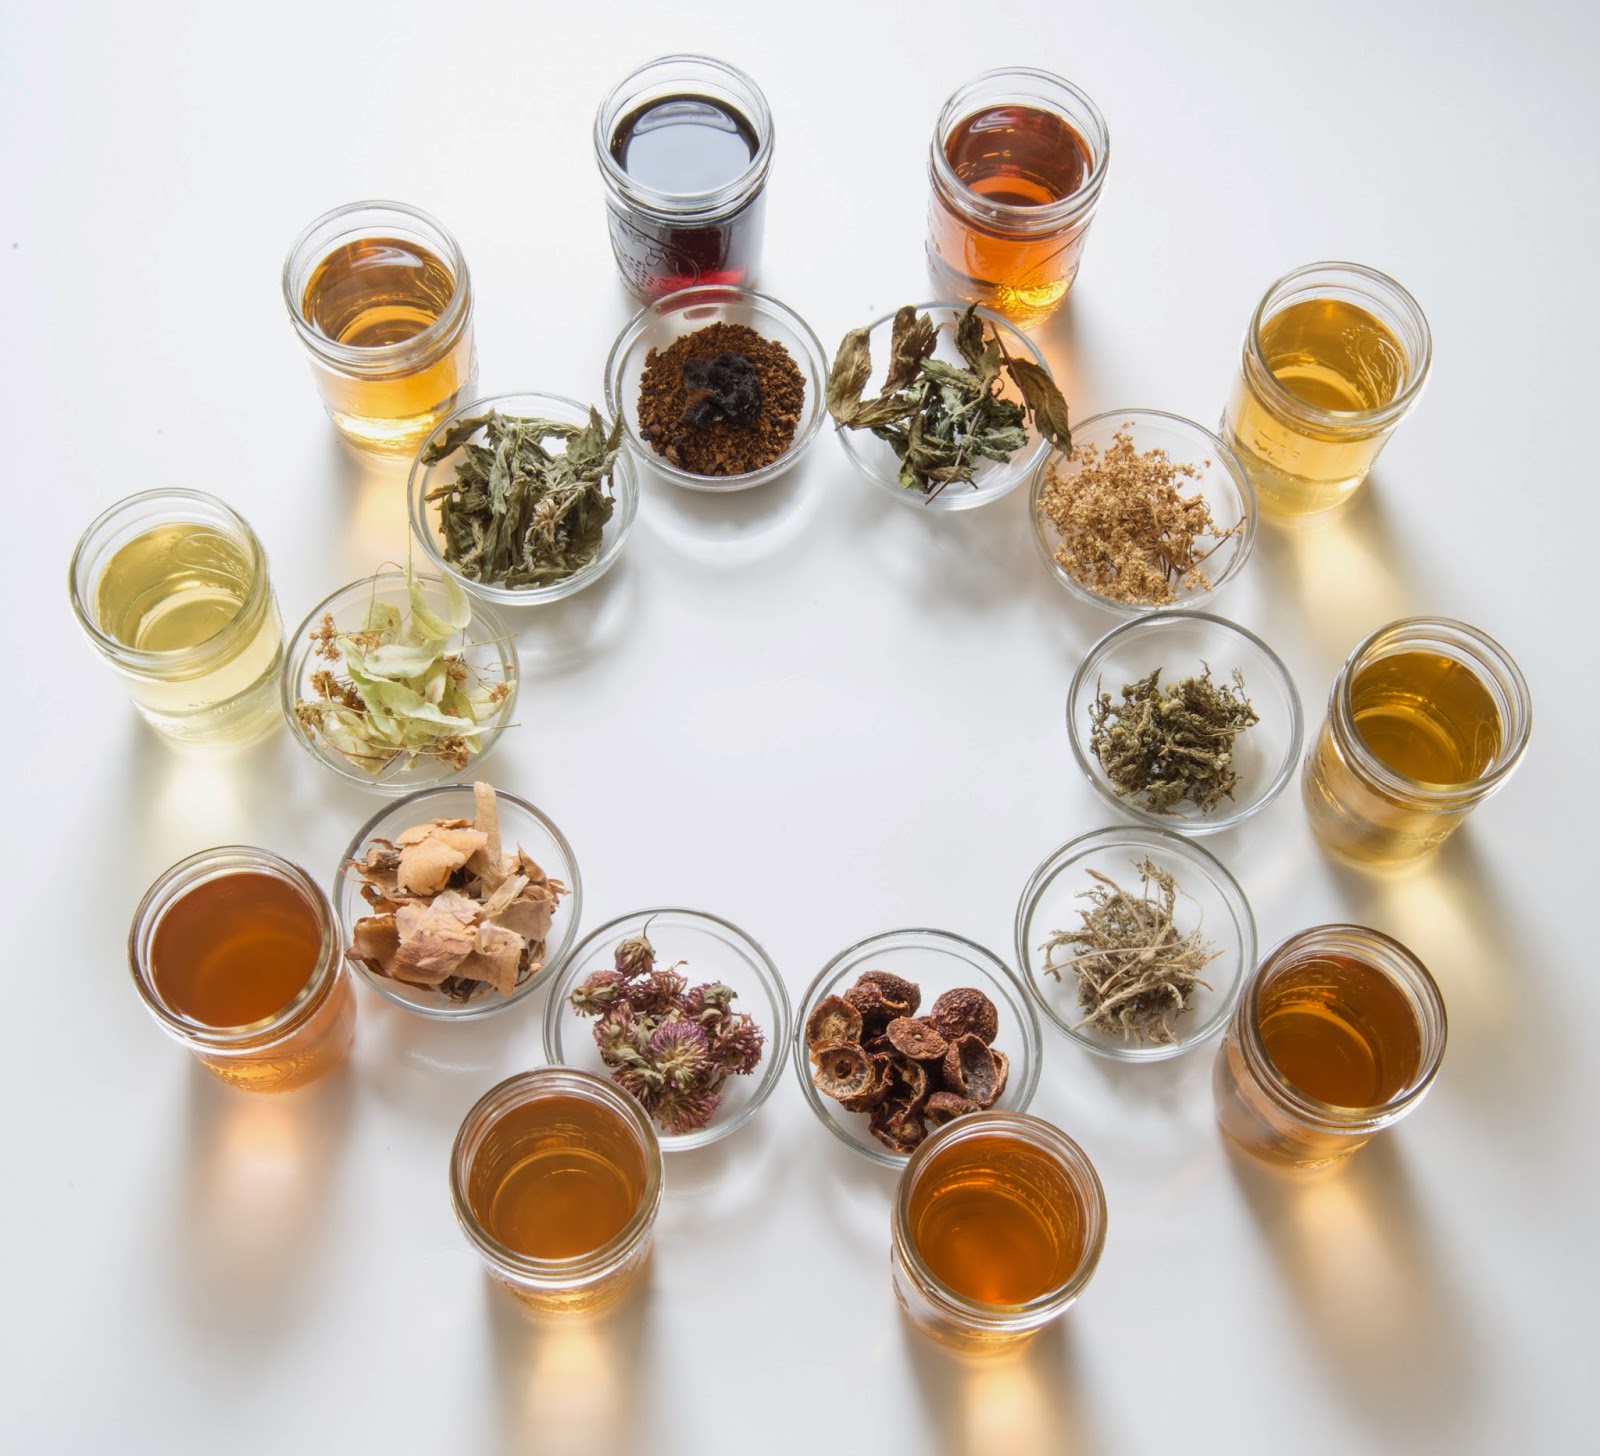
OK, let's identify and talk about the tisanes, starting from the top row, upper left corner. Most are infusions, and a few are decoctions. Infusions are made by steeping dried or fresh herbs in warm or boiled water to extract chemical compounds or flavors. Decoctions are actively boiled or simmered for a short period of time to extract flavors and chemical compounds from tougher plant parts like bark, roots, rhizomes, or stems.


First we have linden bracts, collected from linden trees (Tilia cordata or Tilia americana), often planted in parking lots as ornamentals. The tree grows in a pleasing shape and has lovely, fragrant blooms on the early summer that are attached to a lighter colored bract, which is a modified leaf. Once fertilized by bees and insects, the flower will develop into a small, fuzzy nutlet that persists on the tree for the rest of the year. Robert showed us linden flowers, as they are commonly collected in Hungary and the nectar of the flowers makes a very floral honey. We collect the bracts and dry them in loosely packed in large paper bags, shaking them every day to move them around, and opening the bags every few days to let a beetle or two fly away! The tisane is steeped in boiled water for 15 minutes, and lightly sweetened with honey to make a soothing and delicious drink, which both Robert and Gillian drink.


Next are yarrow leaves (Achillea millefolium). We use the leaves of common white-flowered yarrow, which grows prolifically along trails and in abandoned fields. We pick the fresh leaves to crush and use on minor scrapes and cuts, as fresh yarrow encourages clotting of blood. The leaves are dried in a dark place, and steeped in hot water for 15 minutes to make a slightly astringent tisane that can be useful in reducing mild fevers or as a digestive tonic.


Pineapple weed (Matricaria discoidea) is a wild cousin of chamomile, with an added bonus of a pineapple scent! The flower cones look very similar to chamomile, but without the white petals. It is considered mildly invasive in North America, but this diminutive weed grows in places many other plants won't bother with, like compacted gravel drives, along trails and roadsides, and in general poor soil. We find large areas of it in the driveway at our local CSA farm and collect it with the farmer's permission. An infusion of dried pineapple weed is sweet all by itself, and good for gastrointestinal upset and gas. We collect mostly the flower cones by gently picking them off the plant, but the leaves are also fragrant and can be added to a tisane.


Many varieties of perennial mints (Mentha species) grow wild, and we love to stumble upon a patch while out in the woods or exploring abandoned fields. Sometimes we find a spearmint or a cat mint, but they all make fine, fragrant tisanes. Aside from the agreeable flavor, a mint tisane is good for nausea, indigestion, gas, mild fever, and headaches. Sometimes we make a very strong infusion and add it to Gillian's bath water for a relaxing soak (and a good-smelling kid!). We dry the mint tips and leaves in a brown paper bag in a dark place, shaking it around every day. We know of several mint patches, but will not bring any home to transplant, as mint can be a voracious spreader, taking over large swaths of a garden or completely filling a planter.


We don't collect too many elderflower heads (Sambucus nigra), because then we wouldn't get to come back to gather the berries later in the season! The fresh flowers are very fragrant, and can be plucked off the stems and added to pancakes or crepes. The infusion of dried flowers can be drunk hot for fever and mucous producing conditions of the upper respiratory tract like hay fever. You can use the cooled infusion as a gargle for mouth ulcers and sore throats as well. We hang the flower umbels of elderberry to dry, then store then in sealed glass jars.


Red clovers (Trifolium pratense) are a kid's favorite to eat, picking each tube-shaped flower off the flower head to taste the nectar inside. We collect the flowers before they turn brown and wilt, drying them in a paper bag. The infusion is brewed for about 15 minutes, and has a sweet taste. Red clover contains isoflavones, which are water-soluble chemicals that act like estrogens. Most benefits of red clover are realized through tinctures, so we just drink the tisane because it tastes nice.


Sassafras (Sassafras albidum) is a drink that many folks in the Appalachian areas of North America recognize and adore. It grows prolifically in southern New England as well, as we collect the roots and inner bark to dry, before simmering into a strong decoction. There have been over-hyped cancer warnings associated with the consumption of sassafras tea or decoction, but the government studies were flawed due to a need to ban safrole, a manufacturing component of the drug MDMA. A strong decoction of sassafras root can be used to make natural root beer. Sassafras is very fragrant in an almost spicy way, and we all really love the taste of a lightly sweetened, chilled sassafras drink in the summer.


The Mythical, Medicinal, Magic Chaga (Inonotus obliquus)!! Chaga is the sterile conk of a fungus that attacks birch trees; we find it on white, yellow, and black birches in our area rather often. There are many medicinal claims being made about chaga on the internet right now, talking about anti-cancer properties to life-extension, but I'm not sure if I believe every claim being made about chaga. I can tell you a decoction of chaga tastes really good, especially if sweetened with maple syrup and mixed with coconut milk into a chilled frappe drink. Overall, the flavor of a plain chaga decoction is similar to black tea. We simmer 1 Tbsp. ground chaga in one gallon of water for about 45 minutes, and reuse the grounds to make two or three more batches of decoction to drink before discarding the used grounds. In the spring, we tap a few maple or birch trees and use the fresh sap to simmer the chaga, reducing the sap slightly to make a naturally sweetened drink.


An infusion of nettles (Urtica dioica) in the winter is an iron boost for me, as I tend to suffer from chronic anemia. We gather the top 4-6 inches of nettles in mid-spring, long before they flower, by using gloves and scissors to avoid the sting. Once dried in the dehydrator on a low setting, nettles lose their sting and can be handled without protection, and stored in large glass containers. The flavor of a nettle infusion is pleasantly green and grassy, and can be drunk without sweetener. The 15 minute nettle infusion in boiled water is also good for stimulating circulation, relieving rheumatism, and relieving eczema. When the nettles are fresh and tender, we eat bucket loads of them, and they freeze well to use all year.


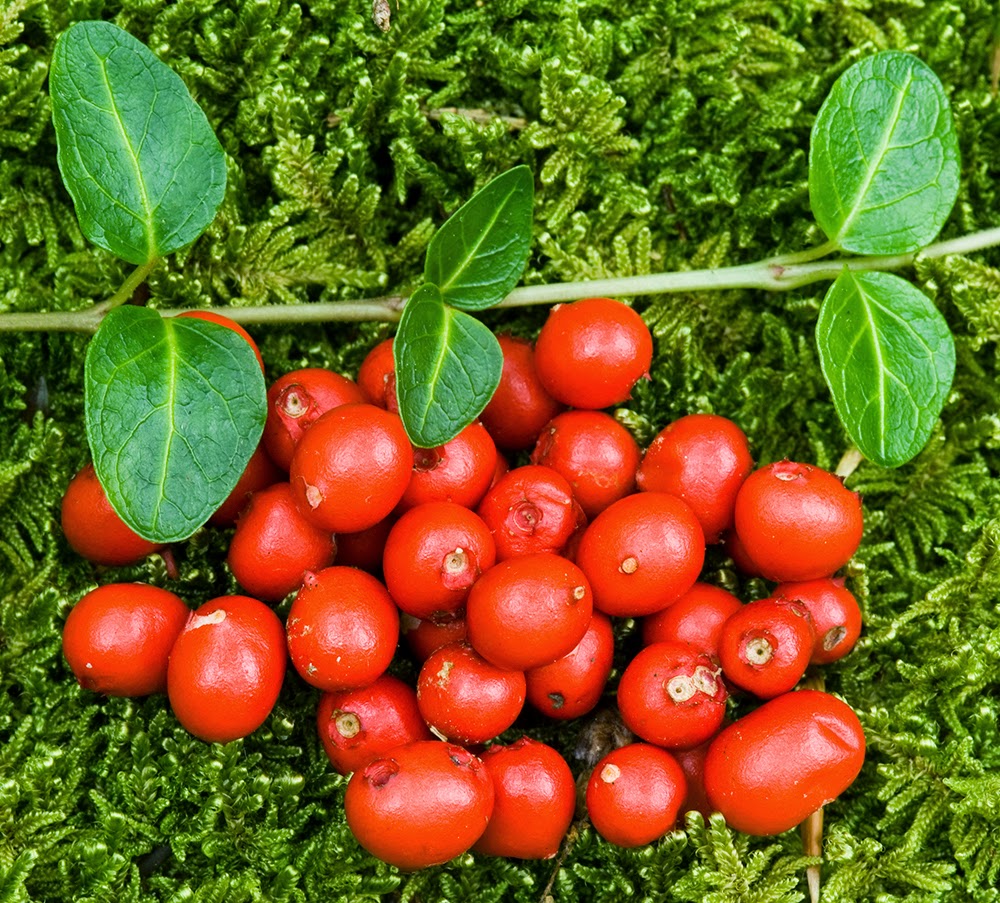
Finally we have some dried beach rosehips (Rosa rugosa), a common invasive along the coasts of New England. The hips of all roses are edible, but the beach roses produce very large, meaty hips that are relatively easy to collect in large quantities. Once the seed-like achenes are removed from the halved hips, along with the irritating inner hairs, we dry the flesh of the hips in the dehydrator. A 20 minute decoction of the hips produces a sweet, fruity drink that is helpful for chronic diarrhea and stomach weakness. Rosehips also make a wonderful tart jelly filled with vitamin C, and the petals of beach roses are exceptionally fragrant and useful in syrups.
Viewing all 174 articles
Browse latest View live


Latest Images